
Navigate
Products
Download
eShop
Upgrade
Overview
Training
Support

Navigate
Products
Download
eShop
Upgrade
About
Training
Support
Border is an outline object composed of pre-digitized objects (border samples). It can have outlines of a separate color. There are several border samples available in Studio and user can define his/her own border samples. This tutorial will guide you through process of creation of your own border samples and their use in your embroidery designs.

Various borders: simple border with 1 column object,
rope border with outline, complex leaf
border with columns and connections.
Border elements (samples) are small designs, which are like any other designs created in Studio. Therefore, we will use Studio's main Work Area for creation of border samples and not some editor window as it is in case of fill pattern or motif creation. Border samples have some limitations, though, and some Studio controls are disabled during creation of border sample, therefore.
To start creation of a new border sample, click on main menu Design/ Border/ New Border. Special template for borders will appear in the Work Area and some Studio controls will be disabled. Please note that border sample can contain only Column, Column with Pattern, Outline and Connection objects. Tools for creation of other objects are disabled.
The first border example contains only one column object. Note that object fits into Border Cell window and it begins on left side and ends on right side of the cell. Parallel direction of stitches on beginning and end of sample ensures contiguous stitching of border and connections between border samples are not needed.

![]()
To set name and default width and height of border sample, select any object in the Work Area and then use right mouse click to access Parameters Window. Set Comment, Reference Width and Reference Height parameters on the Whole Design Parameters tab.
When creation of border sample is finished, use main menu Design/ Border/ Save Border As to save border to disc. Border is saved as a normal EOF file in compact format without image. If you want to edit border, use main menu Design/ Border/ Open Border. Do not use common Design/ Open command, because there will be no template for border drawing.
This border sample contains column object and outline of another color. When compiling to stitches, Studio reorders border objects so that outlines are sewn after all columns and connections. Therefore, it is useful to draw border sample so that columns sew without a trim and outlines sew without a trim too. Of course, there will be a trim between columns and outlines, because outlines are of different color.


Column object is drawn so that it exceeds the boundaries of the cell on left and right side. This is because the elements of rope should overlap to prevent gaps in stitching. Because of the overlap, there must be connection object before column object to ensure contiguous stitching of columns. Place beginning of connection anywhere, Studio will align it to previous column when compiling all border samples. End of connection must be connected to column object.


Outline is drawn so that its beginning is aligned to end of previous border sample outline, if you imagine several border samples lined up one after another. See below picture how the the outline is drawn to make two or three layers of stitches and to position beginning and end properly.
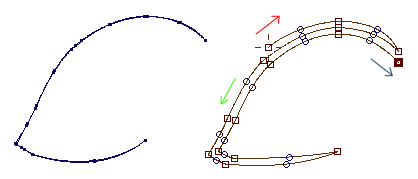
In this example the border sample contains columns and connections. The most important is placement of first and last connection, because they allow contiguous stitching of border. First connection begins on left side of the cell and last connection ends on the opposite side of the cell. The rest of connections serve only for normal connection of column objects within the sample.


To make user defined border samples available in Parameters window when digitizing design, you have to assign your border samples to empty items in the Border samples list. First 5 items in the Border samples list in Parameters window are reserved for user defined samples.
If Studio is still in creation of border sample mode, save border to disc and start a normal new design with use of main menu Design/ New or open any of your existing designs.
Use main menu Objects/ User Editors command and then switch to Assign User Borders tab. Double click on any of 5 user defined border samples and load your own sample from the disc. Click OK when finished.

Now your border samples are linked to design file and they are available in borders list of Outline Parameters window. You can use them for Outline objects in your design.